1. Introduction
2. Common Initialization for USB MSC
3. Using RAM as Storage
4. Using SD Card as Storage
5. Using QSPI as Storage
6. Using Custom External Flash as Storage
7. Conclusion
1. Introduction
In this post, we will explore how to use USB Mass Storage Class (MSC) with the nRF SDK. Initially, we’ll allocate RAM as the storage and demonstrate reading and writing data to this allocated portion. Next, we will use an SD card connected via the SPI interface for storage. Following that, we will interface with QSPI memory to handle storage tasks. Finally, we will guide you through using custom external flash as the storage, detailing the process of reading and writing data to it
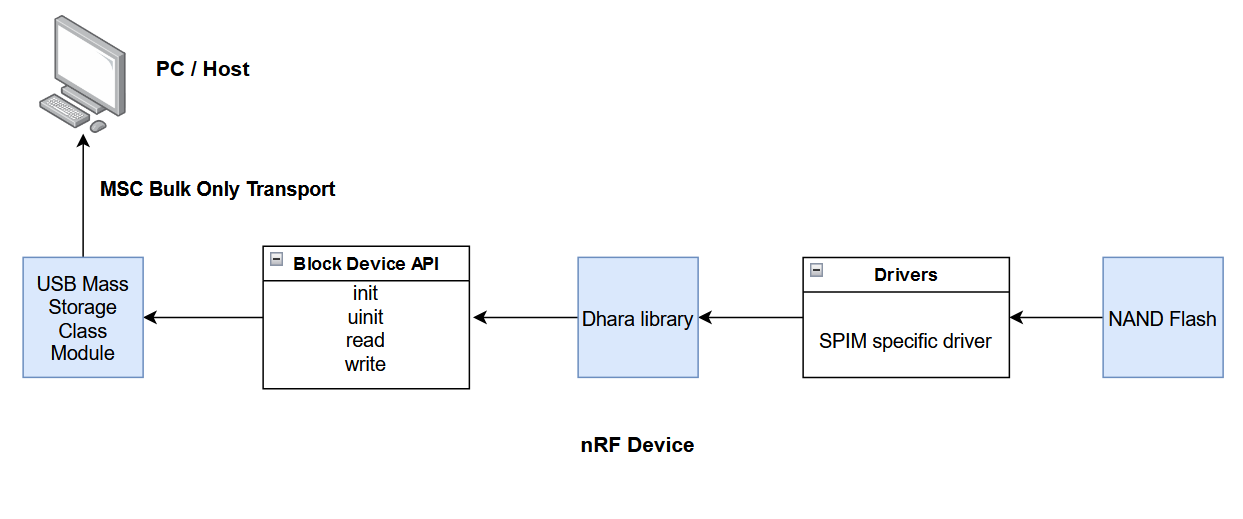
You can use USB MSC module to create many instances of the Mass Storage Class. Every instance of the class can handle up to 16 disks. Every disk has a unique LUN (Logical Unit Number) associated with it. Access to every LUN is provided by the block device API. The following figure shows basic flow of data between USB Mass Storage, the block device, and drivers:

Data flow between USB Mass Storage, block device, and drivers
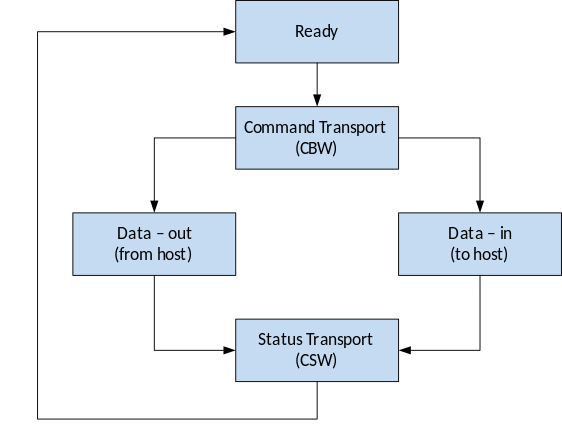
The host uses Mass Storage Class Bulk Only Transport to communicate with the device:

Command execution between the host and the device
2. Common Initialization for USB MSC
To create an instance of the USB MSC, use the APP_USBD_MSC_GLOBAL_DEF macro. The following example shows correct initialization of a MSC instance that handles one block devices as logical units:
#define BLOCKDEV_LIST() ( \
  &m_block_dev_empty \
)
#define ENDPOINT_LIST() APP_USBD_MSC_ENDPOINT_LIST(1, 1)
APP_USBD_MSC_GLOBAL_DEF(m_app_msc, 0, msc_user_ev_handler, ENDPOINT_LIST(), BLOCKDEV_LIST(), 512);
The following example shows how to register an instance of the Mass Storage Class
ret_code_t ret;
static const app_usbd_config_t usbd_config = {
    .ev_state_proc = usbd_user_ev_handler
};

ret = app_usbd_init(&usbd_config);
APP_ERROR_CHECK(ret);

app_usbd_class_inst_t const * class_inst_msc
= app_usbd_msc_class_inst_get(&m_app_msc);
ret = app_usbd_class_append(class_inst_msc);
APP_ERROR_CHECK(ret);

ret = app_usbd_power_events_enable();
APP_ERROR_CHECK(ret);
The usbd_user_ev_handler function handles USB events:
static void usbd_user_ev_handler(app_usbd_event_type_t event)
{
    switch (event)
    {
        case APP_USBD_EVT_DRV_SUSPEND:
            break;
        case APP_USBD_EVT_DRV_RESUME:
            break;
        case APP_USBD_EVT_STARTED:
            break;
        case APP_USBD_EVT_STOPPED:
            app_usbd_disable();
            break;
        case APP_USBD_EVT_POWER_DETECTED:
            if (!nrf_drv_usbd_is_enabled()){
                app_usbd_enable();
            }
            break;
        case APP_USBD_EVT_POWER_REMOVED:
            app_usbd_stop();
            m_usb_connected = false;
            break;
        case APP_USBD_EVT_POWER_READY:
            app_usbd_start();
            m_usb_connected = true;
            break;
        default:
            break;
    }
}
Remember to include the following code in the main while loop to process USB events:
while (true)
{
    while (app_usbd_event_queue_process())
    {
        /* Nothing to do */
    }
}
3. Using RAM
In this part, we allocate RAM as the storage and configure the block device for RAM. This setup allows us to read and write data to the allocated RAM portion. The following is an example of correct block device initialization for a RAM block device:
/**
 * @brief Ram block device size
 *
 * @note Windows fails to format volumes smaller than 190KB
 */
#define RAM_BLOCK_DEVICE_SIZE (190 * 1024)

/**
 * @brief  RAM block device work buffer
 */
static uint8_t m_block_dev_ram_buff[RAM_BLOCK_DEVICE_SIZE];

/**
 * @brief  RAM block device definition
 */
NRF_BLOCK_DEV_RAM_DEFINE(
    m_block_dev_ram,
    NRF_BLOCK_DEV_RAM_CONFIG(512, m_block_dev_ram_buff, sizeof(m_block_dev_ram_buff)),
    NFR_BLOCK_DEV_INFO_CONFIG("Nordic", "RAM", "1.00")
);
4. Using SD Card
We define and initialize the SD card block device. The SD card is connected via the SPI interface, and the pins should be configured according to your hardware setup. The following is an example of correct block device initialization for an SD card:
#define SDC_SCK_PIN     (27)        ///< SDC serial clock (SCK) pin.
#define SDC_MOSI_PIN    (26)        ///< SDC serial data in (DI) pin.
#define SDC_MISO_PIN    (2)         ///< SDC serial data out (DO) pin.
#define SDC_CS_PIN      (32 + 15)   ///< SDC chip select (CS) pin.

/**
 * @brief  SDC block device definition
 */
NRF_BLOCK_DEV_SDC_DEFINE(
    m_block_dev_sdc,
    NRF_BLOCK_DEV_SDC_CONFIG(
        SDC_SECTOR_SIZE,
        APP_SDCARD_CONFIG(SDC_MOSI_PIN, SDC_MISO_PIN, SDC_SCK_PIN, SDC_CS_PIN)
     ),
     NFR_BLOCK_DEV_INFO_CONFIG("Nordic", "SDC", "1.00")
);
5. Using QSPI
In this part, we define and initialize the QSPI block device. This configuration includes a 512-byte block size, write-back caching, and the default QSPI driver configuration. The following is an example of correct block device initialization for a QSPI block device:
/**
 * @brief  QSPI block device definition
 */
NRF_BLOCK_DEV_QSPI_DEFINE(
    m_block_dev_qspi,
    NRF_BLOCK_DEV_QSPI_CONFIG(
        512,
        NRF_BLOCK_DEV_QSPI_FLAG_CACHE_WRITEBACK,
        NRF_DRV_QSPI_DEFAULT_CONFIG
     ),
     NFR_BLOCK_DEV_INFO_CONFIG("Nordic", "QSPI", "1.00")
);
6. Using Custom External Flash as Storage
To use custom external flash as storage, we need to implement a custom block device using the block device API (init, uninit, blk_read, blk_write,…)
const nrf_block_dev_ops_t nrf_block_device_custom_ops = {
        .init = block_dev_custom_init,
        .uninit = block_dev_custom_uninit,
        .read_req = block_dev_custom_read_req,
        .write_req = block_dev_custom_write_req,
        .ioctl = block_dev_custom_ioctl,
        .geometry = block_dev_custom_geometry,
};
Initialization Function
This function initializes the custom driver required for communication with the external flash.
static ret_code_t block_dev_custom_init(nrf_block_dev_t const * p_blk_dev,
                                     nrf_block_dev_ev_handler ev_handler,
                                     void const * p_context)
{
    FRESULT ff_result = FR_OK;
    ret_code_t err_code = NRF_SUCCESS;

    ASSERT(p_blk_dev);
    nrf_block_dev_custom_t const *p_custom_dev = CONTAINER_OF(p_blk_dev, nrf_block_dev_custom_t, block_dev);
    nrf_block_dev_custom_work_t *p_work = p_custom_dev->p_work;

    NRF_LOG_INST_DEBUG(p_empty_dev->p_log, "Init.");

    p_work->p_context = p_context;
    p_work->ev_handler = ev_handler;
    p_work->geometry.blk_size = p_custom_dev->custom_config.block_size;
    p_work->geometry.blk_count = p_custom_dev->custom_config.block_count;

    your_custom_flash_init();

    if (p_work->ev_handler)
    {
        /*Asynchronous operation (simulation)*/
        const nrf_block_dev_event_t ev = {
                NRF_BLOCK_DEV_EVT_INIT,
                NRF_BLOCK_DEV_RESULT_SUCCESS,
                NULL,
                p_work->p_context
        };
        p_work->ev_handler(p_blk_dev, &ev);
    }
    return err_code;
}
Uninitialization Function
This function uninitializes the custom driver.
static ret_code_t block_dev_custom_uninit(nrf_block_dev_t const * p_blk_dev)
{
    ASSERT(p_blk_dev);
    nrf_block_dev_custom_t const * p_custom_dev = CONTAINER_OF(p_blk_dev, nrf_block_dev_custom_t, block_dev);
    nrf_block_dev_custom_work_t * p_work = p_cust_dev->p_work;

    NRF_LOG_INST_DEBUG(p_custom_dev->p_log, "Uninit.");
    your_custom_flash_uninit()
    if (p_work->ev_handler)
    {
        /*Asynchronous operation (simulation)*/
        const nrf_block_dev_event_t ev = {
                NRF_BLOCK_DEV_EVT_UNINIT,
                NRF_BLOCK_DEV_RESULT_SUCCESS,
                NULL,
                p_work->p_context
        };
        p_work->ev_handler(p_blk_dev, &ev);
    }
    //fs_uninit();
    memset(p_work, 0, sizeof(nrf_block_dev_custom_work_t));
    return NRF_SUCCESS;
}
Read Function
This function reads data from the custom external flash using the custom driver.
static ret_code_t block_dev_custom_read_req(nrf_block_dev_t const * p_blk_dev,
                                         nrf_block_req_t const * p_blk)
{
    ASSERT(p_blk_dev);
    ASSERT(p_blk);
    ret_code_t ret = NRF_SUCCESS;
    nrf_block_dev_custom_t const * p_custom_dev = CONTAINER_OF(p_blk_dev, nrf_block_dev_custom_t, block_dev);
    nrf_block_dev_custom_config_t const * p_custom_config = &p_custom_dev->custom_config;
    nrf_block_dev_custom_work_t const * p_work = p_custom_dev->p_work;

    if ((p_blk->blk_id + p_blk->blk_count) > p_work->geometry.blk_count)
    {
        NRF_LOG_INST_ERROR(
            p_custom_dev->p_log,
            "Out of range read req block %"PRIu32" count %"PRIu32" while max is %"PRIu32,
            p_blk->blk_id,
            p_blk->blk_count,
            p_blk_dev->p_ops->geometry(p_blk_dev)->blk_count);
        return NRF_ERROR_INVALID_ADDR;
    }

    ret = your_custom_read(p_blk->p_buff, p_blk->blk_i, p_blk->blk_count);

    if (ret != NRF_SUCCESS)
    {
        NRF_LOG_INST_ERROR(p_custom_dev->p_log, "Custom read error: %"PRIu32"", ret);
        return ret;
    }

    if (p_work->ev_handler)
    {
        /*Asynchronous operation (simulation)*/
        const nrf_block_dev_event_t ev = {
                NRF_BLOCK_DEV_EVT_BLK_READ_DONE,
                NRF_BLOCK_DEV_RESULT_SUCCESS,
                p_blk,
                p_work->p_context
        };
        p_work->ev_handler(p_blk_dev, &ev);
    }
    return NRF_SUCCESS;
}
Write Function
This function writes data to the custom external flash using the custom driver
static ret_code_t block_dev_custom_write_req(nrf_block_dev_t const * p_blk_dev,
                                          nrf_block_req_t const * p_blk)
{
    ASSERT(p_blk_dev);
    ASSERT(p_blk);
    nrf_block_dev_custom_t const * p_custom_dev = CONTAINER_OF(p_blk_dev, nrf_block_dev_custom_t, block_dev);
    nrf_block_dev_custom_work_t * p_work = p_custom_dev->p_work;
    ret_code_t ret = NRF_SUCCESS;

    if ((p_blk->blk_id + p_blk->blk_count) > p_work->geometry.blk_count)
    {
        NRF_LOG_INST_ERROR(
            p_custom_dev->p_log,
            "Out of range write req block %"PRIu32" count %"PRIu32" while max is %"PRIu32,
            p_blk->blk_id,
            p_blk->blk_count,
            p_blk_dev->p_ops->geometry(p_blk_dev)->blk_count);

        return NRF_ERROR_INVALID_ADDR;
    }

    ret = your_custom_write(p_blk->p_buff, p_blk->blk_id, p_blk->blk_count);

    if (ret != NRF_SUCCESS){
        NRF_LOG_INST_ERROR(p_custom_dev->p_log, "Custom write error: %"PRIu32"", ret);
    }

    if (p_work->ev_handler)
    {
        /*Asynchronous operation (simulation)*/
        const nrf_block_dev_event_t ev = {
                NRF_BLOCK_DEV_EVT_BLK_WRITE_DONE,
                NRF_BLOCK_DEV_RESULT_SUCCESS,
                p_blk,
                p_work->p_context
        };

        p_work->ev_handler(p_blk_dev, &ev);
    }
    return NRF_SUCCESS;
}
IOCTL Function
This function handles any specific control commands for the block device
static ret_code_t block_dev_custom_ioctl(nrf_block_dev_t const * p_blk_dev,
                                      nrf_block_dev_ioctl_req_t req,
                                      void * p_data)
{
    nrf_block_dev_custom_t const * p_custom_dev = CONTAINER_OF(p_blk_dev, nrf_block_dev_custom_t, block_dev);
    switch (req){
        case NRF_BLOCK_DEV_IOCTL_REQ_CACHE_FLUSH:{
            bool * p_flushing = p_data;
            NRF_LOG_INST_DEBUG(p_custom_dev, "IOCtl: Cache flush");
            if (p_flushing){
                *p_flushing = false;
            }
            return NRF_SUCCESS;
        }
        case NRF_BLOCK_DEV_IOCTL_REQ_INFO_STRINGS:{
            if (p_data == NULL){
                return NRF_ERROR_INVALID_PARAM;
            }
            nrf_block_dev_info_strings_t const * * pp_strings = p_data;
            *pp_strings = &p_custom_dev->info_strings;
            return NRF_SUCCESS;
        }
        default:
            break;
    }
    return NRF_ERROR_NOT_SUPPORTED;
}
Geometry Function
This function returns the geometry of the block device.
static nrf_block_dev_geometry_t const * block_dev_custom_geometry(nrf_block_dev_t const * p_blk_dev)
{
    ASSERT(p_blk_dev);
    nrf_block_dev_custom_t const * p_custom_dev = CONTAINER_OF(p_blk_dev, nrf_block_dev_custom_t, block_dev);
    nrf_block_dev_custom_work_t const * p_work = p_customk_dev->p_work;
    return &p_work->geometry;
}
Below is the flow of my custom NAND flash implementation. You can use this as a reference

Result
After implementing the custom block device and initializing it, you should be able to use the custom external flash as storage for USB MSC. Below is an example result showing successful porting of the custom flash

7. Conclusion
In this post, we have explored how to implement USB Mass Storage Class (MSC) with the nRF SDK using various types of storage. We covered the initialization and setup for using RAM, SD cards, QSPI memory, and custom external flash as storage mediums. We hope this guide helps you in implementing USB MSC with different storage options on the nRF SDK. If you encounter any issues, don’t hesitate to contact us at [email protected]


